
Are you ready to dive into the fascinating world of art? Today, we will unlock the secrets of drawing one of the most intricate and beautiful features of the human face – the Ear! Whether you’re an aspiring artist or simply looking for a new creative outlet, learning to draw an ear can be challenging and rewarding. In this step-by-step guide, we’ll walk you through each stage of creating a lifelike ear drawing, from establishing its basic structure to adding intricate details that bring it to life. So grab your pencils, and let’s embark on this artistic journey of step-by-step drawing of ear together!
What You Will Need
You can use a few fancy materials or expensive tools when drawing an ear. In fact, all you need are some basic supplies you already have lying around.
- Pencil (HB, 2B, 4B, 6B, Charcoal)
- Eraser
- Kneadable Eraser
- Sharpener
- Piece of Paper
- Blending Stump or Tissue Paper
With these simple materials, you can tackle the step-by-step process of drawing an ear!
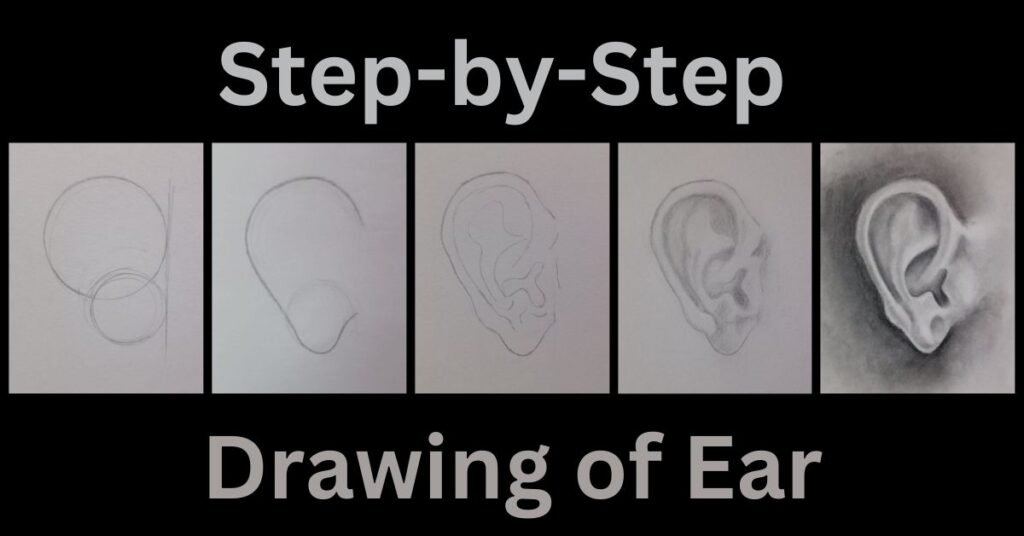
Step-by-Step Guide to Ear Drawing
By following the outlined steps, you will learn how to draw ears. Remember that drawing is an art form that requires both technical skill and creativity. Feel free to experiment with different techniques or styles to make your drawings unique.
So grab your pencils, paper, and erasers, and practice drawing an ear!
Step One
Draw a Geometric Outline

When drawing the Ear, starting with a geometric outline can provide a solid foundation for your artwork. This step is crucial in capturing the overall shape and proportions of the Ear accurately.
Gather your materials – a pencil, eraser, and paper. Find a reference image of an ear to guide you throughout the process.
Draw a straight line for the alignment. Next, lightly sketch two intersecting circles adjoining the line that will act as guidelines for placing different parts of the Ear.
Keep it simple and focus on getting the basic structure right rather than adding intricate details at this stage. Remember to use light pressure when drawing your geometric outline so that it’s easy to make adjustments later on if needed.
With Step One completed, you can build a rough framework in subsequent steps.
Step Two
Draw the outer shape of the Ear

This is where things start to take shape, and your drawing resembles an actual ear.
Start by focusing on the overall structure of the Ear. Notice how it curves and tapers towards the bottom. Pay attention to any distinctive features or details you want to capture in your drawing. Remember, every person’s ears are unique, so don’t be afraid to add some individuality!
Next, use light pencil strokes to sketch out the basic outline of the Ear. Start at the top and work your way down, carefully observing each curve as you go along.
Step Three
Sketch the inner diagram of the Ear
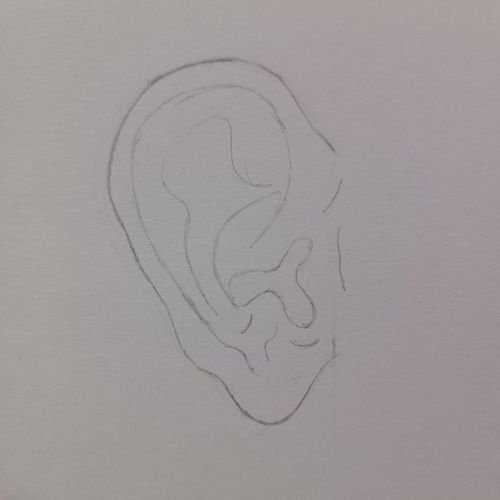
Now that you have outlined the basic shape and structure of the Ear, it’s time to delve into the intricate details of its inner diagram. This step is crucial as it adds depth and realism to your drawing.
Take your time to carefully sketch these shapes, paying attention to their proportions and curves.
Remember to include features such as piercings or earrings if desired. They can add an extra element of personalization and style to your artwork.
Remember, practice makes perfect when it comes to mastering this step. Take reference from images or even study your ears in a mirror for better accuracy.
Step Four
Add the Details

Start by observing where the light source is coming from. This will help you determine which areas should be lighter or darker. Use soft pencil strokes to sketch these shapes onto your drawing lightly.
Focus on adding texture and depth to the inner parts of the Ear. This includes capturing the ridges, grooves, and valleys found within. Be patient as you work through this step, taking your time to ensure accuracy.
Remember that shading plays a vital role in creating realism. Identify areas where shadows fall and gradually darken them using varying degrees of pressure with your pencil. Blend lighter tones into darker ones seamlessly for a smooth transition.
Step Five
Shade and Highlight the details

Use a variety of pencils with different tones to create shadows and highlights. Begin by lightly shading the inner part of the Ear, gradually building up layers of graphite or charcoal for a smooth gradient effect. Pay attention to the curves and creases of the Ear, adding texture where needed.
Remember that shading is about creating contrast, so don’t be afraid to experiment with techniques like cross-hatching or stippling. These methods can add even more depth and texture to your drawing.
Next, use an eraser or a blending stump to lighten certain areas that would catch more light. This will create highlights that make your drawing pop. Take time with this step, as it requires careful observation and precision.
Remember the highlights! Lightly erase or lift off some graphite using a kneaded eraser where the light hits certain areas of the Ear to create shine and dimensionality.
By focusing on these details, you’ll be amazed at how much more lifelike your ear drawing becomes! So take your time with this step and enjoy bringing out those intricate features that make each person’s ears unique.
With time and dedication, you will see improvement in your abilities. Keep honing your skills by exploring other subjects, too – there’s always something new waiting for you!
Happy drawing!


Many thanks for the help in this question, now I will know.
Probably, I am mistaken.
I congratulate, you were visited with simply magnificent idea