
Welcome to the fascinating world of art! Drawing is a wonderful way to express your creativity and bring imagination to life on paper. If you’ve ever wondered how to draw a nose, you’re in the right place. In this step-by-step guide for drawing of nose, we will walk you through the process of drawing a realistic nose that will make your artwork truly captivating. So grab your pencil, sharpen it up, and let’s dive into the intriguing journey of mastering nose drawing techniques! Whether you’re an aspiring artist or just looking for a fun activity, this tutorial is perfect for beginners and art enthusiasts alike. Let’s get started!
Materials you will need
When it comes to drawing, having the right materials can make a big difference in your artwork. Here are some essential items you will need for How to draw a nose:
1. Paper: Choose a smooth and sturdy paper that is suitable for pencil or pen drawings.
2. Pencils: Invest in a set of graphite pencils with varying degrees of hardness (HB, 2B, 4B), which will allow you to achieve different shades and tones.
3. Eraser: A good quality eraser is essential for fixing mistakes and creating highlights in your drawing.
4. Blending tools: Use blending stumps or tortillons to smudge and blend the pencil lines for seamless shading effects.
5. Patience and practice: Drawing takes time and practice, so be patient with yourself as you learn new techniques and develop your skills.
Remember, having these materials on hand will give you the best chance at creating a realistic and well-rendered nose drawing. So gather your supplies, find inspiration, and let’s get started on our step-by-step journey!
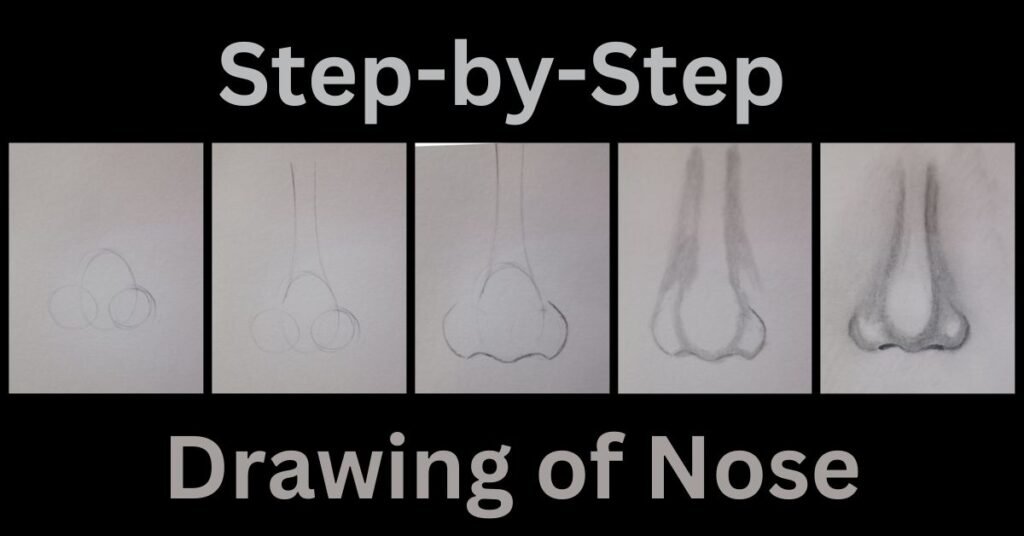
How to Draw a Nose Step- by- Step
Step One

Begin by lightly sketching the general shape of the nose on your paper. Remember, this is just a rough outline to give you an idea of where everything will go.
Next, focus on the nostrils. Start by drawing two small ovals or circles at the bottom of your nose shape. These will serve as a guide for creating realistic-looking nostrils later on.
Step Two

Start by adding some definition to the bridge of the nose. Using light, feathery strokes, draw two lines that curve slightly inward towards each other. These lines should extend from where you placed your guidelines in Step One.
Remember, every artist has their style when it comes to drawing noses – so don’t be afraid to embrace yours!
Step Three

Next, focus on drawing the nostrils. Begin by sketching two small ovals or circles at the bottom part of your nose shape. Remember to keep them symmetrical and aligned with each other.
Moving up from there, draw a curved line connecting each nostril to the sides of your nose shape. This creates depth and adds dimension to your drawing.
Now that we have completed the initial steps of our nose drawing, it’s time to move on to Step Four. This step will help us add more detail and definition to our drawing.
Step Four

In Step Four, we will focus on adding the nostrils and refining the shape of the nose.
To start, observe the light source in your reference or imagination. Determine where the light is hitting the nose and where shadows are cast. Use this information as a guide for shading.
Start by lightly sketching two ovals or circles at the base of your nose shape – these will be your nostrils. Remember, don’t press too hard with your pencil as you want these lines to be easily erased later.
Next, take a closer look at your reference photo or model and observe how the shape of the nostrils connects to the overall structure of the nose. Use light strokes to outline this connection and any other details you notice.
Step Five: Finishing up your drawing

Now that you have established the basic structure of the nose, it’s time to add some depth and details. This step will truly bring your drawing to life!
Using a soft pencil or charcoal, lightly shade in areas that appear darker or create shadows on the nose. Remember to build up layers gradually rather than applying heavy strokes all at once.
Pay close attention to subtle variations in value and texture. The bridge of the nose may have smoother skin compared to the tip or sides, which might contain more bumps or pores.
Next, use an eraser or kneaded eraser to lift off highlights on areas that catch more light. This will help create contrast and enhance realism.
Continue refining your drawing by adding small details such as nostrils, wrinkles, or any other distinctive features unique to your subject’s nose.
Remember, practice makes perfect! Don’t be discouraged if your first attempt doesn’t turn out exactly how you envisioned it. Keep experimenting with different techniques until you find what works best for you.
Stay tuned for our next blog post where we’ll delve into advanced tips and tricks for mastering realistic drawings!
Now go ahead and put these steps into practice! With dedication and perseverance, you’ll soon be creating stunning nose drawings that capture every curve, line, and contour in exquisite detail.
So why wait? Start sharpening those pencils now – the world of art awaits you!

